HOW TO APPLY

Start with Confidence

Your first application only takes a few minutes. After that, most women get it done in just a minute.

Step-by-step

Follow these steps for faster, more consistent placement.

  1. 01

    Prep

    Clean and dry upper eyelids completely. Remove oil, skincare, and makeup residue before placement.

    Tip: Oil-free skin improves hold and comfort.

  2. 02

    Place

    Use tweezers to lift one strip and place it along your preferred crease to create a more open-looking lid.

    Tip: Start near the center of your crease, then fine-tune up or down to find the best fold. Some of our customers even place the strip at an angle. Not sure where your fold is? See the placement guide below.

  3. 03

    Press

    Lightly press end-to-end so the strip blends and stays in place throughout the day. This is how the strip becomes transparent!

  4. 04

    Finish

    Wear alone or continue with most makeup routines once placement is set.

    Tip: Most users apply in under a minute with practice. Strips hold comfortably for 12+ hours.

PLACEMENT GUIDE

Finding your fold is the key to a natural lift.

The strip works by giving your eyelid structure, preventing the skin from folding over and creating a more open, lifted appearance. Where you place it determines how subtle or dramatic the lift looks. Close your eye and find the line where your lid naturally folds - that's your starting point. Center the strip directly over that fold so the crease sits in the middle of the strip. After a few applications, you'll know your ideal spot by feel.

4-panel placement guide showing a hooded eye, how to find the fold, where to place the strip, and the lifted result.
Use tweezers, not fingers. Place your first application on the fold, then fine-tune to find your ideal spot.

MAKEUP TIPS

Matte finishes blend best.

Shimmer and metallic eyeshadows can catch light on the strip's edge, making it more visible. Matte formulas blend seamlessly over and around the strip. If you love shimmer, apply it to the inner corner or brow bone and keep the lid area matte.

Comparison showing shimmer eyeshadow reflecting on the strip edge and matte eyeshadow blending the strip in.

Where GLARISE fits in your morning routine.

Apply GLARISE after cleansing and before primer. The strip adheres best to clean, dry skin. Once placed, continue with primer, shadow, liner, and mascara as usual.

Morning routine order graphic showing cleanse, apply GLARISE, prime, shadow, liner, and mascara.

CARE & WEAR

How long they last and how to remove them.

Wear Time

  • Each strip is designed for single-day use. Apply in the morning, remove at night.
  • Strips hold comfortably for 12+ hours on clean, dry skin.
  • If a strip begins to lift at the edges during the day, gently press it back down. If it won't hold, remove and apply a fresh strip.

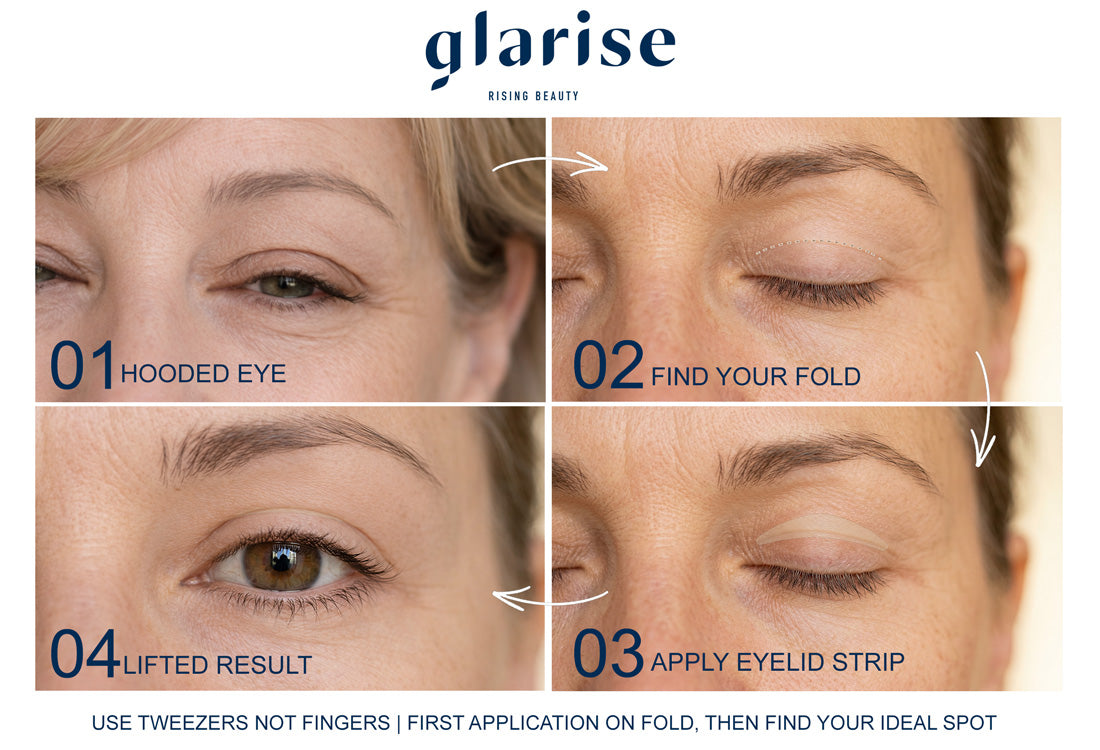
Tip: Always use the included tweezers - not your fingers. The oils on your fingertips weaken the adhesive, which is the most common reason strips peel at the edges.

Removal

  • Lift one corner gently and peel slowly toward the center of the lid.
  • For extra comfort, apply micellar water to the strip's edge before peeling.
  • Never yank or pull quickly - the eyelid area is delicate.
  • Follow up with your normal cleansing routine.

Troubleshooting

Having trouble? These are the most common first-time issues.

The strip lifts at the edge

Use the included tweezers instead of your fingers during application. The oils on your fingertips weaken the adhesive, which is the most common reason the edges peel.

Strips are visible

Make sure you're using the included tweezers, applying to a clean and dry eyelid, and pressing lightly along the full length of the strip. That last step is key - when the strip bonds fully to the skin, it becomes practically invisible.

Can't get a good lift?

Try adjusting the strip slightly higher or lower than your original placement. Every eye shape is different — some customers find that placing the strip at a slight angle gives them the best lift.

WHEN YOU'RE READY

Your first application is the hardest. It also only takes a few minutes.

Start with a 45-day supply and test it risk-free. 60-day money-back guarantee, no questions asked.